Wednesday, November 19, 2008

Supernova

In this tutorial I'll try to show you how to make an interesting supernova. It's really simple step to work on. Perfect for desktop background or signatures. First of all, open new document (Control + N) and fill the layer with black. Make a new layer (Control + shift + N) name the layer 'supernova'. Take a brush around 75px or something around 70px-80px with color #FF0000. (I take a smooth around brush here). Brush a shape at the middle of your document.


Change the red color to #FFC00 (you still have 75px brush selected) and brush the layer on the inside of the red shape (still remain on the same layer)


Repeat same step but change color to #FFFFFF


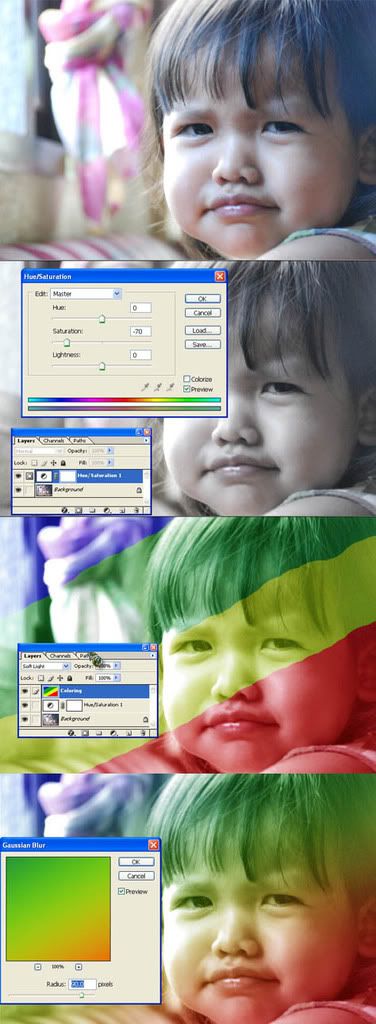
Now go to Filter > Blur > Gaussian Blur and apply the radius to 45px


Create a new layer (Shift +Control + N) reset the color (press D) and go to filter > Render > Clouds. Next, press Control + F about 2 times to repeat the filter. Then, change the blending mode of the layer you just made to Color Dodge.


Go to Layer > New adjustment layer > Levels and press OK without changing the parameters.
Next were going to make a very easy start. Make a new layer (Control + Shift + N) and fill it with black. Go to Filter > Noise > add noise. Amount : 14, Distribution : Gaussian, Monochromatic : Turn ON. When you done doing this. Change the blending mode to screen


Lower the opacity of 'supernova' layer. then make a new layer, fill it with black. Go to Filter > Render > Lensflare. adjust the lens effect. after it done. change the blending mode to screen and you've done in making a supernova!

Sunday, November 16, 2008

Colouring a brush

I found a very interesting technique to coloring a brush.. Open New Document (Control + N) and choose a black as a background. First of all.. u must have a brush.. Pick a brush and splash it to your canvas. (Before that, create a new layer and splash it at the new layer.) Here i choose a fractal brush to demonstrate.


Now. Copy brush layer(drag a layer onto a 'new layer' symbol) and apply the gaussian blur, Filter > blur > gaussian blur.. and then reduce opacity to 40.


Create one layer.. name the layer as "color". on layer color pick a brush (B) and paint the layer with any different colour. Here I use a basic brush with soft mechanical size 150px. And I choose blue & pink color. (2 different color, 1 layer!)


After that. Create a new layer. (And press D). Go to Filter > Render > Clouds. Then Filter > Blur > Gaussian Blur (10px). Set the blending mode to 'vivid light' and reduce opacity to 50
Finally, on layer 'color', set the blending mode to 'overlay' and wallllap!! the result.


Thursday, November 13, 2008

Creating a grass

Open new document (Control + N) Pick a Brush Tool (B)and draw an image like a grass. It's not exactly a like a grass. just.. Brush. Here i use a duller color so when you dodge it become more vibrant


Use Burn Tool (O) to make a shadow at there in the bottom


Now. Highlight the top it with Dodge Tool (O). Remember to set it to Midtones


Smudge the grass (R) with pressure within 70 - 80 depend on realism. smoothly drag you grass upper to make it more real. It will take a little bit time to done it.


Now Dodge it with Highlight setting. Dodge it at the middle area at the grass. Try to minimize the use of this tool. If you use too much it will become worst.


Again, use a Smudge Tool but with a tool size around 9 to make a grass more real and small. Yeah!!


Wednesday, November 12, 2008

Make a simple Background

Follow the rules.
Firstly, create a new document. Control + N and set Width 500 & Height 500. click OK.
make sure the background is white


Go to filter > render > clouds. Follow the picture below.


And your image will be like..


Ok. We want to make it little bit blur. Go to filter > blur > Gaussian Blur. As shown as below. Set radius to 40,2


Colour the cloud with your favorite color. Go to image > adjustment > color balance or press Control + B. Then try to adjust a tone of color.


Your cloud will be colored. i choose a green color.


Pick any pattern or any image. Put into your project. Then make it black & white.
Image > Adjustment > Black and white or press Control+Alt+Shift+B.


Then apply the blend mode to soft light, opacity to 50. see picture below.


Final Result

Tuesday, November 11, 2008

Create a TYPHOgraphy

This lesson is to make your own typography.

1. Open new document. Control + N ( File > New )


2. Create new layer. Control + Shift + N. See picture below


3. Click channel palette & create new layer. One layer will create name alpha 1. Same as pict below


Shortcut B on keyboard for brush and pick a brush. Here i choose a basic brush.


On a layer alpha 1, Draw anything shape @ typo using brush that you choose


After draw, click on filter>pixelate>color halftone & fill the space with number as shown as below & click OK


hasilnya..


On a layer palette, click on layer 1 & load selection. Select>Load Selection
On pop-up menu, select alpha 1 pada channel. Follow the instuction below.
Click OK


will become this..


Shortcut G on keyboard for colouring selected area. pick a colour and click on selected area to colouring it. I choose blue. =) Then diselect area. Control + D. Will come like picture below


Final touch.. Right click on layer 1 and choose blending option. Add some Inner Shadow. reduce opacity. follow the image below


Final


Rich Color Tutorial


Sesetengah gambar akan kelihatan sedikit dull yang mengurangkan keceriaan. Terutamanya kalau pakai kamera yang murah. ya.. murah.. saya pun pakai kamera handset ja.. haha. TAPI kita boleh gunapakai photoshop untuk memeriahkan warna yang ada..


Kenapa? Sebab penggunaan warna dari photoshop adalah bagus. bukannya kita merosakkan warna asal. cuma kita meriahkan ckit warnanya


Let's start.


1) Okay, choose one of your favourite picture


2) First of all, create a new layer (Layer > New > Layer or Shift + Ctrl + N) and Apply Image (Image > Apply Image).


3) Use Hue and Saturation of the new layer (Image > Adjustment > Hue and Saturation) and set the value of saturation to 66%.


Set the Blending Mode to Soft Light.


4) Next, create another new layer and Apply Image.

This time Desaturate it and set the mode to Soft Light too but reduce the Opacity to 50%.

To finish up, create another new layer and Apply Image.


easy rite?

Colourfull of colors


1# Original image

2# Click Images>adjustment>Hue/Saturation ( saturation -70)

3#Add new layer>blend mode=soft light> using brush size 40px or above and colour within the line using a matching colour

4#On layer coloring> click filter>blur>gausion blur(radius=90px)

tadaaa.. Grin


good luck
Kiss

ala Lomo :: warna dull

di posting ni nk ajar ckit2 pasal editing.. pegang pen dan kertas segera.!!
macam mana nak buat satu2 gambar tu nampak ala2 dull ckit..

1st sekali pilih gambar mana yang nk di edit..
saya amik satu gambar sebagai contoh

gambar ni dah nampak cantik tapi saya nak bagi nampak kelam2 ckit.. haha

ok.. pertama skali tgk pada layer anda. ada simbol mangga kunci. kita perlu buang simbol ini untuk tutor kali ni.. kalau x nanti xjadi. caranya klik dan drag simbol mangga tu ke tong sampah di bawah


mula2 skali anda perlu select area yang akan di edit. Tekan M atau klik pada kawasan bertanda pada gambar dibawah

kemudian dengan tool ni.. drag dan select area yang kita akan edit. hasilnya seperti gambar dibawah


kemudian tekan Control + J untuk duplicate area yang kita select


klik pada layer 1 tadi.. tekan Control + L dan set ikut gambar dibawah. setting ni sebagai contoh. anda boleh ubah setting ini secukup rasa. Kemudian tekan OK


Akan nampak perbezaan pada gambar asal dan gambar yang sudah di edit. Step seterusnya, tekan control dan klik pada kedua layer. Tekan Control + E untuk merge layer. Tekan Control + A untuk select full area. Tekan Control + J untuk duplicate layer. hasil seperti dibawah


Tekan Ctrl + Shift + Alt + B untuk black and white. Kemudian tekan OK


Adjust opacity mengikut kesesuaian. Adjust secukup rasa untuk menampakkan wana yang kelam2.

Hasil akan kelihatan seperti di bawah